Monday, April 24, 2017

Design Wall Monday - 4/24/17


DESIGN WALL MONDAY -
Check out all of us who link up with Judy L. -
At Patchwork Times on Mondays.
We have some awesome stuff on our walls!
Well, THEY do - ME - not so much sometimes - ;))
===


On my wall today -

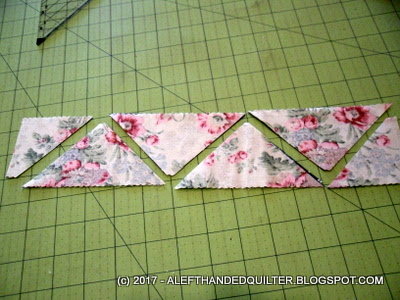
Eight Flying Geese Units - four (4) "light" and four (4) "dark" -
Eight (8) light/dark HST -
And One (1) Hourglass Block -

All cut from two pre-cut 2-1/2" strips -

Using my LEFT-EZE™ Rule - ;))


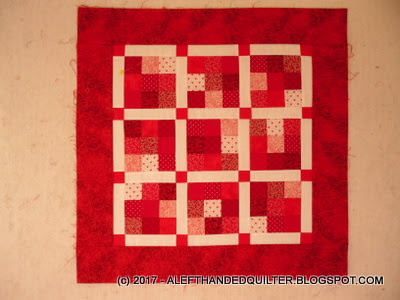
With the Hourglass Block in the center -

I put a "light" Flying Geese unit on each side -
And a HST in each corner - with the "dark" facing "out" -


Then I turned the "dark" HST in each corner to face "in" instead of "out" -


Then I left the "dark" HST alone -
And switched out the "light" Flying Geese for "dark" ones -


Then I turned the "dark" HST in each corner to face "'out" instead of "in" -


Those four (4) variations will make blocks that will finish at 8" - ;))

They may all have "names" but I haven't checked them against the blocks that are available in EQ7 yet - I was just playing with laying them out and moving them around like little puzzle pieces - ;))

Next I want to play with a 12" block version -

I can think of several ways to configure the block -

May even make a pattern -

To go with the ruler -

And try to get it published -

See how that works out - ;))


Talk to you later - gotta go - gotta sew -


Monday, April 10, 2017

A bit of stitching -


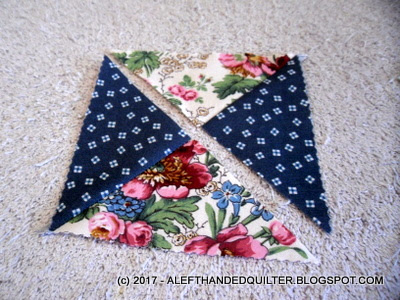
I didn't realize how crookedly I had trimmed those two fabrics on the left until I posted the photo this morning -


My OCD took over and I had to un-sew them and straighten them both out -
Then sew them back together -


And I remembered my post from last month -

Next - but first - ;))

All I wanted to do was fuse/baste the top NEXT -
But before I could do that I had to find some more pinmoors to stabilize it -
And I had used them all on the Christmas Table Topper - "something else" -
So I had to do the stitch-in-the-ditch on that FIRST -
To free up the pinmoors - or buy some more - ;))

The "something else" was my Five Stars Plus 5 -
So I did that -
And added one more to the pile to be quilted - ;))


Talk to you later - gotta go - gotta sew -


Design Wall Monday - 4/10/17


DESIGN WALL MONDAY -
Check out all of us who link up with Judy L. -
At Patchwork Times on Mondays.
We have some awesome stuff on our walls!
Well, THEY do - ME - not so much sometimes - ;))
===


On my wall today -

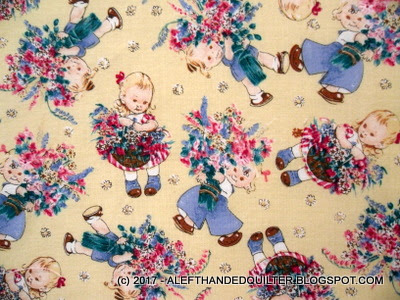
The backing for my Easter Sudoku Quilt top -


The plan was to work up a backing from bits and pieces from my stash -

And to get it quilted - bound - and labeled - ;))

Between filing orders and revising the tutorial for my LEFT-EZE™ Rule -

I only got as far as making the backing -

But I also made the backing for the Valentine's Day Sudoku Quilt -


And the backing for the St. Patrick's Day Sudoku Quilt -


So I think I made some decent progress - ;))


Talk to you later - gotta go - gotta sew -


Wednesday, April 5, 2017

LEFT-EZE™ Rule - Revised Tutorial

NOTE:
When I first introduced my new ruler - LEFT-EZE™ Rule - HERE -
I used the PROTOTYPE when I took the photos.

This tutorial has been REVISED to include photos of the FINAL VERSION -


And shows you how I use the ruler to cut -

Half-Square Triangles (HST) -
And Quarter-Square Triangles (QST) for Hourglass Blocks -
And Flying Geese units -
LEFT-HANDED!! - ;))

=================================================

This tutorial is to demonstrate my new LEFT-EZE™ Rule -


And - just for fun -

I thought that I would do it in the form of a REVIEW -

Using the same format that I used to review the EASY SQUARE JR.
By Sharon Hultgren - EZ Quilting - Antioch, TN USA 37013
www - dot - ezquilting - dot - com - Made in China
My FAVORITE SQUARE ruler - ;))

So here goes -

============
LEFT-HANDED QUILTING - Review - Ruler - LEFT-EZE™ Rule
============
Note - these instructions are written in LEFT-EZE™.
If you are right-handed - just reverse the directions.
============

Today I want to show you a REALLY cool little ruler -

That Left-Handed Quilters can use - hassle-free - ;))

My kind of ruler!! - ;))

But first -

Disclaimer -
I AM affiliated with the manufacturer or supplier of this product -
I did not get this product for FREE in exchange for a review - aka barter.
I designed it and I paid for it.
I have no intention of slandering or libeling anyone or any product.
I am simply stating my opinions - I could be wrong - you may disagree.
My opinions are based on my experience with this product - your results may vary.
I think that about covers it - if I missed something - let me know.
I am not a lawyer - and I am just trying to cover my assets. - ;))
===

It’s called the
LEFT-EZE™ Rule
By A Left-Handed Quilter™
www - dot - alefthandedquilter - dot - blogspot - dot - com
Made in the U.S.A.

Description -
This little ruler is a LEFT-Triangle - ;))
It can be used to cut Half-Square Triangles (HST) -
And Quarter-Square Triangles (QST) for Hourglass Blocks -
And Flying Geese units -
And Squares -
LEFT-HANDED!! - ;))

It measures 6-1/2” - technically 6-7/8" - but who's counting -
It has a 1/4” dashed line on the longest side - the "hypotenuse" - for those who remember your high school Geometry class - so that you can see that the "black tip" in the top right corner is a "dog-ear" that will be automatically cut off because you are using pre-cut strips - ;))


===

Where you can get it -

For now this ruler is not available in your Local Quilt Shop -
Or from your favorite suppliers -
It is only available from me - on my blog(s) -

I set up another blog for my "shop" - LEFT-EZE™ Rule - HERE -
I will be posting various tutorials and information there as well -

You can email me at - caseyq19 - at - gmail - dot - com -
And put "Order" in the subject line -

The cost is $24.95 plus shipping/postage and sales tax if applicable -

Similar sized rulers on the market are priced at the same amount -
And mine is special - different - and LEFT-HANDED - ;))

I will accept personal checks until I get set up with PayPal -
Please understand that it's only me -
And this will all be very "low-tech" until it becomes "high volume" - ;))

===

What I LIKE about this ruler -

It's LEFT-HANDED!! - ;))

The easy-to-read numbers down the right side -
The fact that the numbers read 1-2-3-4-5-6 from TOP to BOTTOM -
In the LEFT Column when you can read "This way for a DIAGONAL cut" -

And that they also read 1-2-3-4-5-6 from TOP to BOTTOM -
In the LEFT Column when you can read "This way for a STRAIGHT cut" -

And it has a "hang-hole" in the BOTTOM LEFT corner - ;))

===

What I DON’T like about this ruler -

There are no “grabber” thingys on the bottom side -
So it MAY slip on your fabric -
But that’s not really something that bothers me -
Because I don't usually have that problem -
And there are plenty of options available if you choose to add them - ;))

===

How to USE the ruler -

Start with some pre-cut strips -
Either from your scrap bag -
Or of the size stated in a pattern -

You can also determine the width of strip that you want/need -
By using the LEFT-EZE™ Rule SIZE CHART -
Available on the LEFT-EZE™ Rule blog - HERE - ;))

===

How I use it to Trim the Selvage end of the strips -

For Half-Square Triangles (HST) -
Start with two contrasting strips -
(I used pre-cut 2-1/2" strips for these demos)
And place them right sides together -


Line them up with a horizontal line on your cutting mat - to keep them straight -


TURN the ruler so that you can read - This way for a STRAIGHT cut -


Line it up with a vertical line on your mat -
With the strip between ANY two horizontal lines -
Using the other horizontal lines to keep the ruler straight -


Cut UP the LEFT side of the ruler -


===

How I use it to Cut a Half-Square Triangle -

TURN the ruler so that you can read - This way for a DIAGONAL cut -


Line up the RIGHT side of the ruler along the cut edge of your strips -
With the "black triangle tip" at the TOP RIGHT of the strip -
The bottom of the strips will line up with a line on the ruler depending on its width -
Using the other horizontal lines to keep the ruler straight -
Cut UP the LEFT side of the ruler -


TURN the ruler so that you can read - This way for a STRAIGHT cut -


Line up the RIGHT side of the ruler along the cut edge of your strips -
With the "black triangle tip" at the BOTTOM LEFT of the strip -
The top of the strips will line up with a line on the ruler depending on its width -
Using the other horizontal lines to keep the ruler straight -
Cut UP the LEFT side of the ruler -


Sew them along the LONG/DIAGONAL side - starting at the "flat" end -


Press them open -


Use the diagonal line going from the corner to the center of the long side to trim the dog-ears -
The numbers down the LEFT column will help line up the bottom of the HST -


Does it "measure" 2-1/2" square? -

Yes, it does - ;))


===

How I use it to Cut Quarter-Square Triangle units -
To make an Hourglass Block -


Using two contrasting strips - right sides together -
TURN the ruler so that you can read - This way for a DIAGONAL cut -
And make the first cut exactly the same way you did for a HST -


TURN the strip -
So that the cut edge lines up with a horizontal line on your cutting mat -


Using the DIAGONAL lines -

Line up the RIGHT side of the ruler along the cut edge of your strips -
With the "itty bitty - black triangle tip" at the BOTTOM LEFT of the strip -
The TOP of the strips will line up with a line on the ruler depending on its width -
Using the vertical lines to keep the ruler straight -
Cut UP the LEFT side of the ruler -


TURN the ruler -
Line up the RIGHT side of the ruler along the cut edge of your strips -
With the "black triangle tip" at the TOP RIGHT of the strip -
The bottom of the strips will line up with a line on the ruler depending on its width -
Cut ACROSS the TOP side of the ruler - From LEFT to RIGHT -


One HST - and two QST -


Sew the QST along the SHORT side -
Keeping the same fabric on top -
And sewing from the "flat" side -


Press them open -


Match the two sides -


Stitch them together -

Trim the dog-ears -
Using the diagonal line going from the corner to the center of the long side -
The numbers down the LEFT column will help line up the bottom of the block -


Do they measure 4-1/2" square - Yup! - ;))


If you cut QST in sets of two - you can start and end with a HST - ;))


===

How I use it to Cut a Flying Geese Unit -
I took two of the QST from above to use as the "Geese" units -

And used two strips - folded over onto themselves -
Because you need two "mirror image" "Wing" sections -
You need both a LEFT and a RIGHT wing for each "Geese" section -


I layered the white/flower strip on top of the blue strip -
To cut four layers at the same time -


Cut the HST just like before -


Then cut another set just because -


Opened them up -


Matched them to the "Geese" units -
With the "flat" sides at the top of the unit -
And the "pointy" ends at the bottom -


Started with one of the RIGHT "Wings" -
And put it on top of the "Geese" -
Right sides together -


Stitched them together -


Pressed them open -


Added the LEFT "Wing" -


Flipped them over so I could sew from the "flat" side -


Pressed them open -


See the "extra" blue on the right side -
That's for your 1/4" seam allowance when you sew it to the next unit or block -
So you don't cut off the point -


Trim the dog-ears like you did the HST -


And it measures 2-1/2" x 4-1/2" - ;))


So -
From two pre-cut 2-1/2" strips - I made all of this -


Which can be arranged to make this -


Or this -


Or this -


The possibilities are endless - ;))

===

Bottom line -

No more "flipping" rulers - OVER - BACK - or SIDEWAYS -

The numbers go in the CORRECT direction -

And are EASY TO READ -

Because -

It's LEFT-HANDED!! - ;))

Would I recommend this ruler?

YES - ;))

===


Talk to you later - gotta go - gotta sew -


LinkWithin

Related Posts Plugin for WordPress, Blogger...