Thursday, September 28, 2017
Getting ready -
Usually takes me a while - ;))
I like to be prepared -
And I really don't like surprises -
So I spent most of the day exploring various forums -
And "help" sites -
Searching for answers to my many questions -
Regarding the set up of my business in Quickbooks - ;))
I know from experience that some things may need to be done in a certain order or the results are not what you anticipated and it may be difficult to correct "after-the-fact" - so I'm trying to avoid that - ;))
I had to laugh -
One section talked about Edit Menu - Preferences -
And I'm not there yet -
But I'm pretty sure that the list does NOT include my #1 Preference -
Spend the entire day Quilting - ;))
Talk to you later - gotta go - gotta sew -
Wednesday, September 27, 2017
Choices - choices -
And more choices -


It sure is handy to have a sample to see how various designs turn corners -
Some of these sections have corners where the diagonals go the SAME direction -
Check out that center gold piece -

So I made a sketch - then made some copies - and drew some designs -
I was thinking "lazy eights" with maybe "something else" in the corners -
And I guess I could change the direction of the "slant" at the "straight" seam lines -
Or just go with the flow and let them "slant" whichever way they want to -
More sketches are needed before I dare try to stitch it -

But mostly I'm stalling -
Behind the scenes of blogland - I'm trying to figure out and set up Quickbooks on my computer- before the end of the year. As a retired professional accountant - I HATE Quickbooks - especially the part where they say "No professional experience required" - yeah - unless it messes up and you want/need to un-screw it! -
I may be overthinking it -
But my biggest problem seems to be that I already know how to record the entries -
And now I have to spend time figuring out how the guy who wrote the program wants me to do it -
UGH!! - ;))
Talk to you later - gotta go - gotta sew -
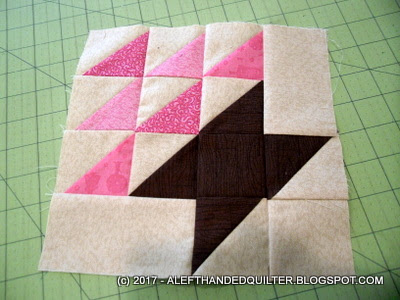
Tuesday, September 26, 2017
I'm drawing a blank -
As to where to start on this one -

I pressed it - and sat staring at it for a while - then I got distracted - did some more chores - sorted some more paperwork - paid some more bills - and it hasn't quilted itself while I was busy doing other things - unfortunately -
Any suggestions? - ;))
Talk to you later - gotta go - gotta sew -
Monday, September 25, 2017
Changed my mind -
After I made the first potholder - the one on the bottom right - ;))
The prints look OK on the backs -

But some of the poor chickens and roosters got their heads (and other body parts) cut off when I cut the strips and sewed them back together -


They don't even want to play well together on the wall -

There's just too much going on in these - they don't look good to me AT ALL -
So - rather than waste any more Insul-Brite or batting -
I relegated them to the "orphan block" pile -
And took a look at my Mountain To Be Quilted - ;))

I think I'm going to tackle that instead -
And start with this one - ;))

Talk to you later - gotta go - gotta sew -
Sunday, September 24, 2017
Getting it together -
Didn't take long for this little one -
But these are taking me a bit longer - ;))

It sure is handy to not have to "re-think" it -
I already figured out the sizes that I need to cut and the sewing sequence -
All I have to do is follow my own instructions - ;))

Talk to you later - gotta go - gotta sew -
Saturday, September 23, 2017
More potholders -
Might be on the agenda for the next couple of days - ;))
While I was straightening up - I found this -

It needs to be sewn together - and rather than be an "orphan" block - I thought that it might make a good potholder - then I got to thinking that I might want to make a couple more while I was at it - just because - ;))
So - now where did I put that potholder pattern/tutorial ? -
Do you think I could find that dang thing? -
Nope -
BUT -
Next best thing -
I did a SEARCH on my own blog -
You know - that little white box in the top LEFT corner - above the name of any blog - next to the BLOGGER box - the BIG WHITE B in the ORANGE box -
And I found my post Some Potholders - HERE -
I printed it out and pulled some fabric -
I should be able to find five nice ones in this batch -

I think these will do - roosters are always fun -

I thought about including the "chicks" -

But decided not to -
I think that they will be so much MORE fun showing up unexpectedly in something with YELLOW scrappy patches - don't you think? - ;))
Talk to you later - gotta go - gotta sew -
Friday, September 22, 2017
Finally done - AGAIN -
Today I finished binding my Halloween Churn Dash - AGAIN -
And no - this is NOT the same "glamour shot" that I posted the first time I put the binding on -

This time it is DONE!! - ;))
It even has the hanging triangles and label sewn on - ))

The binding came out much better this time - it always helps when I cut it at the correct width so the points don't get chopped off -

The corners even cooperated this time around -

The label was attached a bit off-center because I wanted to use orange thread and had to make sure that the area on the front was "orange" so it wouldn't show that much -

So I shifted it a bit so that it would be on the back of this block -

And it doesn't show that much unless you look REALLY closely. If it were going to be entered in any sort of competition, I would attach the label by hand and make sure that the stitching didn't show on the front - but for a "utility" quilt - I'm more interested in the label staying attached through several washings - so I sew it by machine to the back through all of the layers - ;))

In other news - I received some "squishy mail" today -
Rhonda at Ravelly1 is asking us to help her celebrate her approaching her 1600th(!!) post by leaving comments on the posts leading up to the big day - and telling her what our favorite color is -
Well, my favorite color changes almost daily but one day I left a comment that it was RED - and I won - HERE -
And she sent me this! -

THANK YOU, Rhonda!! - ;))

Talk to you later - gotta go - gotta sew -
Thursday, September 21, 2017
Made new binding -
And re-trimmed my Halloween Churn Dash - ;))

I don't know what I was thinking/doing when I trimmed it the first time - but it definitely wasn't trimmed as close as I thought it was - some areas were much wider than they should have been -
But I think it should be OK now -
Guess I'll find out soon enough - ;))
Talk to you later - gotta go - gotta sew -
Wednesday, September 20, 2017
Maybe tomorrow -
I'll make and play with some new binding for my Halloween Churn Dash -

Because I sure didn't get to it today -
I spent too much time sorting more paperwork - which seems to multiply faster than my scraps - if that's possible -
And I ran out of energy -
So - no new photo to post -
No new nothing on the quilting front -
Or back -
Or binding - LOL - ;))
Talk to you later - gotta go - gotta sew -
Tuesday, September 19, 2017
Took it all off -
Yup - I finished ALL of the unsewing last night - YAY!!
I put the old binding in a baggie - just in case I want to mess with it one of these days - take off all the little bits of thread - press it open - maybe use it in some "string" quilts - I sure don't want to use it for "binding" - it's too narrow - ;))

I had some more chores today - so I thought that after I finished them up - I would be able to re-press the quilt top. Gotta love that fusible batting!! Then I want/need to double check the edges and re-measure the trim line that I marked in this post. I think I have a bit too much "extra" in some areas - and that might have been part of my problem -

And then I will recut a new batch of binding - ;))
Anyway - I didn't get to it today -
Maybe tomorrow -
And maybe this time I'll it get to look better - LOL - ;))
Talk to you later - gotta go - gotta sew -
Monday, September 18, 2017
Half off -
Last night after dinner I un-stitched the pieces you see in the bottom of the photo -
And the rest of the decorative stitch side -
ALL the way around -
So it's HALF OFF - LOL - ;))

I stayed up late so I could get it done and have that much less to do today -
And now that I have done my chores - paid bills and organized some paperwork - I should be able to get the rest done. It's not that bad - but it takes time - and doesn't lend itself to a whole lot to blog about - haha - ;))
Talk to you later - gotta go - gotta UNsew some more -
Sunday, September 17, 2017
Stalling -
Is waaaay more fun than UNsewing - ;))
It seems that I was able to find LOTS of things to do today other than this -

That's about as far as I got -
And tomorrow I have chores to do -
So I have another excuse -
But - excuses won't get it done -
And it won't unsew itself -
So I need to put on some good music (thanks, Gene) -
And JUST DO IT - ;))
Talk to you later - gotta go - gotta UNsew some more -
Saturday, September 16, 2017
So fun -
To play with making the "Heart" for the Halloween Churn Dash -

Not so much fun to start the "UNsewing" -

But the sooner I get it done - the sooner I can fix it - ;))
Talk to you later - gotta go - gotta UNsew -
Friday, September 15, 2017
It might be a couple of days -
Before I get to anything other than my Halloween Churn Dash - ;))
Yesterday I stitched down the binding - and I fought that binding all afternoon - it did NOT want to fold over nicely and the corners did not cooperate AT ALL! -
I finished it up and posted the picture - with NO close-ups if anyone noticed - and thought that I would/could "let it go" - but then I slept on it and realized what I had done wrong -
BOB forgot and cut the binding at 2-1/4" instead of 2-1/2" - and the extra 1/4" that was missing made a BIG difference. So today I decided I'm going to take it all off and do it over - and that may take me a while -
But I can't just leave it - it looks horrid! - ;))

Before I start taking it apart I made the "scrap card" and the "label" - ;))

I still need to make the "heart". I don't have any scraps left over from the charm packs that I used on the front - so I'll have to make do with the trimmings from the back - ;))
This is getting posted early - because I won't have much to show for a while - ;))
Talk to you later - gotta go - gotta UNsew -
Thursday, September 14, 2017
I got a late start -
But I finally got the binding sewn to the Halloween Churn Dash -
Tomorrow I'll make the label and finish that part - ;))

I got sidetracked this morning watching YouTube videos -
What a great way to spend a VERY fast couple of hours - ;))
Here are some of the ones I watched -
Mc Tavishing - Free Motion Quilting
Katherine Vickery - Published Jul 16, 2013
She commented that she was Left-Handed and "ball point pens don't cooperate with me." Really??? To me, the way she holds her pencil is both interesting and awkward. I hold my pencil the same way a Right-Handed person holds theirs and have never had a problem with ball point pens or smearing. My mother was Right-Handed and insisted that there was NO reason I couldn't hold my pencil the same way she held hers - just pointing the "other" way - so I did. It was always funny when a client realized that I was Left-Handed - simply because they had never noticed before - ;))
And then I watched all three of these "Swirl" tutorials -
Along with a whole bunch more - listed on the side -
Quilters Apothecary
Jamie's Basic Swirl Part 1 of 3
Jamie Wallen - Published on Mar 9, 2014
Jamie's Basic Swirl Part 2 of 3
Jamie Wallen - Published on Mar 16, 2014
Jamie's Basic Swirl Part 3 of 3
Jamie Wallen - Published on Mar 23, 2014
Then before I knew it -
It was mid-afternoon and I hadn't sewn a stitch - ;))
Talk to you later - gotta go - gotta sew -
Wednesday, September 13, 2017
I had to go back -
To this post to find the links for the Hanging Triangles -
#1 - How to Hang Small Quilts - It's Easy! - Heirloom Creations - HERE -
#2 - How to Hang Your Quilts with 3 Hand Stitches - HERE -
Laura Ann Coia - SewVeryEasy - May 22, 2014
I said at the time that
the first one is similar to the one I was looking for - and the second one is very clever - I might try that on some of my larger quilts -so this was the perfect quilt to play with that second technique - ;))

I also found another video by Laura that I want to try NEXT time -
A Quick and easy Stitch to Quilt Your Quilt - HERE -
Laura Ann Coia - SewVeryEasy - Sept. 10, 2015
That stitch might work nicely on one of my Christmas quilts -
And I like how there is always something NEW to try - ;))
In the meantime - I thought I would talk a little bit more about sewing my binding to the back - BEFORE I trim the quilt -
I don't remember when or why I started doing it that way - but it works for me - and now it's the only way I do it - ;))
I like to sew the binding to the back and flip it to the front because I can't do the hand stitching anymore - and it's "neater" on the front if I stitch it from the front - and I really don't care if a stitch line shows on the back. To me - it looks like another line of quilting.
I also like sewing the binding on first because it gives me something to hang on to with my right hand as I line up the raw edge of the binding on the marked line. I think the "extra/untrimmed" fabric attached to the edge of the quilt top helps stabilize the outer edge. For me, it's hard to sew 1/4" or 3/8" from the edge (depending on the foot) without it getting "wavy". People say to "stay-stitch" it first - but if you trim the edge before you stay-stitch - it's basically the same thing - and still gets wavy on me.
The only thing I have to watch is where I mark the line - it will be the "edge" of the quilt when I trim it - so I try to put it where the binding won't chop off any "triangle points" when it gets folded to the front.
Try it on something small - see if it works for you - ;))
On this quilt - I attached the binding to the back and trimmed one side at a time -
(Sorry about the glare - my overhead lights don't play nicely with plastic rulers)

I have to be careful not to cut into the miter in the top corner - so I fold it back out of the way -

Slip the folded part under the ruler - and trim the edge -

When I turn the corner - I don't have to worry so much - because that's where the binding was folded up and then down (forming the miter) to match the next side of the quilt -

When it's all trimmed - and the quilt is flipped over - it looks like this -

And I think that - when I fold the binding over to stitch it down -
That it will be just right!! - ;))

I'll finish stitching the binding tomorrow -
And then make the label -
Tomorrow should be a VERY good day -;))
Talk to you later - gotta go - gotta sew -
Tuesday, September 12, 2017
The binding is made -
And I've decided that I need to measure out 4-1/2" from the "ditch" line on the outermost "units". The ruler is 5" wide and the line just outside the outer edge of the fabric is the 4-1/2" line. That little bit of batting showing at the edge should be just enough to "fully stuff" the binding and make sure that the folded edge doesn't chop off any of my corners. "Should be" is the key phrase in that last sentence - ;))

So - flip it over - find the "ditch" seam - and mark my line on the back - ;))

After the lines are marked - I'll take it to the sewing machine that is set up with the walking foot and the big tables - the same machine that I use to "ditch" quilt -
I'll line up the raw edge of the binding with the chalk line - sew it on with the walking foot - which is a 3/8" seam - then trim the quilt even with the binding - fold the binding to the front - and top-stitch it down with a decorative blanket stitch -
At least that's the plan - ;))
I haven't decided if I want to add corner squares or a sleeve to it yet. I didn't add them to the Thanksgiving Churn Dash which came out to 36" x 36" - thinking I would use it as a table topper - but this one is 48" x 48" - so maybe I should - ;))
I think I'll sleep on it and decide before I attach the binding - ;))
Talk to you later - gotta go - gotta sew -
Monday, September 11, 2017
Even with a map -
I got myself all mixed up -
Because I didn't start in the top left corner - on Row 2 - "Unit" #1 - ;))

I only wanted to deal with half of the bulk of the quilt under the throat of my machine - so I started in the middle - Row 5 - "Unit" #7 -

And - of course - the first "center" square in that section goes in the opposite direction - which I would have noticed if I had actually READ my map - LOL - ;))
Just because you have a map - doesn't mean you can't get lost - ;))
But it's OK - I made it work - I just "reversed" it and made all of the center squares slant the "other" way from the map - and as long as they alternate - the design works -

And it came out pretty well -
I LOVE the texture - ;))

And in other news - something that I DID notice -
Was the lettering on the tabs of some little address books that I got -

You can't see real well in that photo - but the tabs read ABCDE - FGHIJ - KLMNO - PQRST - UVWXYZ - like they are supposed to -

Except on these guys -

I guess one out of four ain't bad -

And it was easy enough to fix - I just removed the staples - refolded the page that was backwards - and stapled them all back together. It made me wonder until I realized that they were made in China - and the people who assembled them probably have no idea how our alphabet works - ;))
Talk to you later - gotta go - gotta sew -
Subscribe to:
Posts (Atom)
LinkWithin
